

Craving something that’s silky, minty, and downright indulgent? These Decadent Dark Chocolate Peppermint Truffles with Creamy Filling combine the intense richness of 70% cocoa dark chocolate with a refreshing hint of peppermint. Each bite melts luxuriously on the tongue, revealing a smooth ganache center that’s been kissed by heavy cream and butter. Whether you’re treating yourself after dinner or sharing festive gifts, these homemade truffles are bound to impress. Dive in and discover just how easy it is to whip up a sweet holiday classic in your own kitchen!
Key Ingredients
Gathering quality components is the first step to crafting melt-in-your-mouth peppermint truffles. Each ingredient plays a vital role in building layers of flavor and texture.
- 8 oz dark chocolate (70% cocoa or higher), chopped: Deep, bittersweet backbone that melts into a luxuriously rich ganache.
- 1/2 cup heavy cream: Adds creamy, smooth texture and helps emulsify the chocolate for a silky center.
- 1/4 teaspoon peppermint extract: Infuses a crisp, refreshing mint flavor that brightens the chocolate.
- 1/4 cup unsweetened cocoa powder for dusting: Creates a classic, velvety coating that prevents stickiness.
- 1/2 cup crushed peppermint candies or candy canes: Provides a festive crunch and vibrant peppermint snap on the exterior.
- 1/4 teaspoon sea salt: Balances sweetness and enhances the depth of the dark chocolate.
- 1 tablespoon unsalted butter, at room temperature: Enriches the ganache for extra smoothness and shine.
How To Make Decadent Dark Chocolate Peppermint Truffles with Creamy Filling
Ready to transform simple ingredients into festive bites of chocolatey heaven? Follow these step-by-step instructions to melt, whisk, chill, shape, and coat your truffles, mastering essential pastry techniques along the way. Whether you’re a seasoned hobbyist or an intermediate home cook, you’ll find the process straightforward and satisfying. Keep your tools close, clear some fridge space, and let’s get started crafting these addictive peppermint treats.
1. Begin by chopping the dark chocolate into small, uniform pieces and placing them in a heatproof bowl. This ensures even melting without scorching or lumps.
2. In a small saucepan over medium heat, pour in the heavy cream and bring it just to a simmer—keep a close eye to prevent boiling and burning at the edges.
3. Once the cream reaches a gentle simmer, pour it over the chopped chocolate and let the mixture rest for 2–3 minutes. This softens the chocolate before stirring.
4. After resting, use a whisk to stir from the center outward until the ganache is completely smooth. Add the unsalted butter and peppermint extract, stirring until fully incorporated.
5. Cover the bowl with plastic wrap and refrigerate for 1–2 hours, or until the ganache is firm enough to scoop and hold its shape.
6. When the chocolate mixture is set, use a small cookie scoop or melon baller to portion out even mounds. Roll each mound between your palms into a smooth ball, accepting a little mess—this is part of the fun!
7. Arrange the truffle balls on a parchment-lined baking sheet. Return the tray to the refrigerator and chill for another 30 minutes to firm up the surfaces.
8. Meanwhile, prepare two shallow bowls: one with unsweetened cocoa powder and another with crushed peppermint candies, ready for coating each truffle.
9. Remove the truffles from the fridge and roll half in cocoa powder and the other half in crushed peppermint—press gently to adhere the toppings. Place them back on the baking sheet.
10. Finally, transfer your decorated truffles to a decorative box or serving dish. Store in the refrigerator for up to one week, if they manage to last that long!
Serving Suggestions
These truffles are versatile treats that shine at holiday gatherings, cozy nights by the fire, or as elegant gifts. Here are a few ideas to elevate your presentation and tasting experience:
- Serve on a festive platter with sprigs of fresh mint or holly for a charming holiday display.
- Pair with a steaming cup of espresso or peppermint hot chocolate to balance sweetness with a warm, comforting sip.
- Present in individually wrapped paper liners or cellophane bags tied with ribbon for portable, gift-ready treats.
- Drizzle with melted white chocolate and sprinkle extra crushed candy canes just before serving to add visual flair and extra sweetness.
Tips For Perfect Decadent Dark Chocolate Peppermint Truffles with Creamy Filling
Ready to up your truffle game? A few simple tweaks can make these peppermint delights even more irresistible, ensuring they look and taste like they came from a gourmet chocolatier.
- Use high-quality chocolate brands like Valrhona or Callebaut for a richer, more complex flavor.
- Substitute the heavy cream with coconut cream to create a luscious, dairy-free version.
- Drizzle melted white chocolate over the truffles before they set for an extra festive look and sweet contrast.
- Package the chilled truffles in decorative boxes or tins—ideal for holiday gifting and ensuring they look as good as they taste.
- Experiment with other extracts like vanilla or orange to customize the flavor profile and surprise your taste buds.
How To Store It
Proper storage helps your homemade peppermint truffles maintain their silky texture and flavor. Keep them chilled and protected following these methods:
- Store in an airtight container in the refrigerator for up to one week; line the container with parchment or wax paper to prevent sticking.
- For a slightly softer bite, remove truffles from the fridge and let them sit at room temperature for 10–15 minutes before serving.
- Freeze in a single layer on a parchment-lined tray until solid, then transfer to a sealed freezer bag for up to one month—thaw overnight in the fridge.
- When transporting or gifting in warm weather, include a cold pack and keep the truffles in a portable cooler to preserve shape and coating.
Frequently Asked Questions
Here are answers to the most common questions about crafting and enjoying these truffles—let’s clear up any doubts so you can truffle with confidence!
- How long does it take to prepare and chill the truffle mixture?
The active preparation time is about 15–20 minutes, which includes chopping the chocolate, heating the cream, whisking the ganache, and rolling the truffles. You then need 1–2 hours of refrigeration to firm up the ganache before rolling, plus an additional 30 minutes of chilling after shaping and coating. In total, plan for around 2 to 2½ hours from start to finish.
- What’s the best way to ensure my chocolate melts smoothly without seizing?
Chop the dark chocolate into uniform small pieces to promote even melting. When heating the cream, bring it just to a simmer—avoid boiling. After pouring the hot cream over the chocolate, let it sit for 2–3 minutes before stirring. Use gentle, continuous whisking from the center outward until silky smooth. Adding butter at room temperature helps enrich the texture and prevent graininess.
- Can I make these truffles ahead of time, and how should I store them?
Yes, you can make the truffles up to one week in advance. After coating, store them in an airtight container in the refrigerator. If you prefer a slightly softer bite, let them sit at room temperature for 10–15 minutes before serving. For longer storage, freeze the truffles in a single layer on a parchment-lined tray, then transfer to a sealed freezer bag for up to one month; thaw overnight in the refrigerator before serving.
- What are the best ingredient substitutions for dietary restrictions?
For a dairy-free version, replace heavy cream with full-fat coconut cream and use a dairy-free dark chocolate. Ensure the peppermint extract you choose is free from natural dairy derivatives. If you need a gluten-free option, verify that your chocolate, peppermint candies, and cocoa powder are certified gluten-free.
- How do I achieve a clean, professional-looking cocoa powder or candy-peppermint coating?
After chilling the rolled truffles until firm, use a fine-mesh strainer to dust cocoa powder evenly. For peppermint coating, finely crush the candies and gently roll each chilled truffle in the pieces, pressing lightly to adhere. Work quickly, returning the truffles to the refrigerator between batches to maintain firmness and prevent melting.
- Any tips for adding extra flavor or festive flair?
You can drizzle melted white chocolate or colored candy melts over the coated truffles for a decorative touch. To broaden the flavor profile, replace or combine peppermint extract with orange extract or a drop of vanilla. Sprinkle a tiny pinch of sea salt on top of each truffle before the drizzle sets to enhance the chocolate’s richness.
- How can I present these truffles as gifts without them losing their shape or coating?
Line a sturdy gift box or tin with parchment paper or decorative paper doilies. Place the chilled truffles in single layers, using small paper liners if desired. Seal the box and include a cold pack if shipping or transporting in warm weather. Advise recipients to refrigerate upon arrival and to enjoy within one week for optimal freshness.
What Makes This Special
These Decadent Dark Chocolate Peppermint Truffles combine the elegance of professional confections with the warmth of home cooking. The interplay of high-percentage dark chocolate, creamy ganache enriched with peppermint, and contrasting textures of cocoa dust and candy cane bits makes every bite unforgettable. Whether whipped up for holiday gatherings or cozy movie nights, they’re a close-to-effortless way to dazzle friends, family, and yourself. Feel free to print this article, stash it in your recipe box, and revisit whenever you need a sweet pick-me-up. Got questions, tweaks, or success stories? Drop a comment below—I’d love to hear how your truffles turn out!
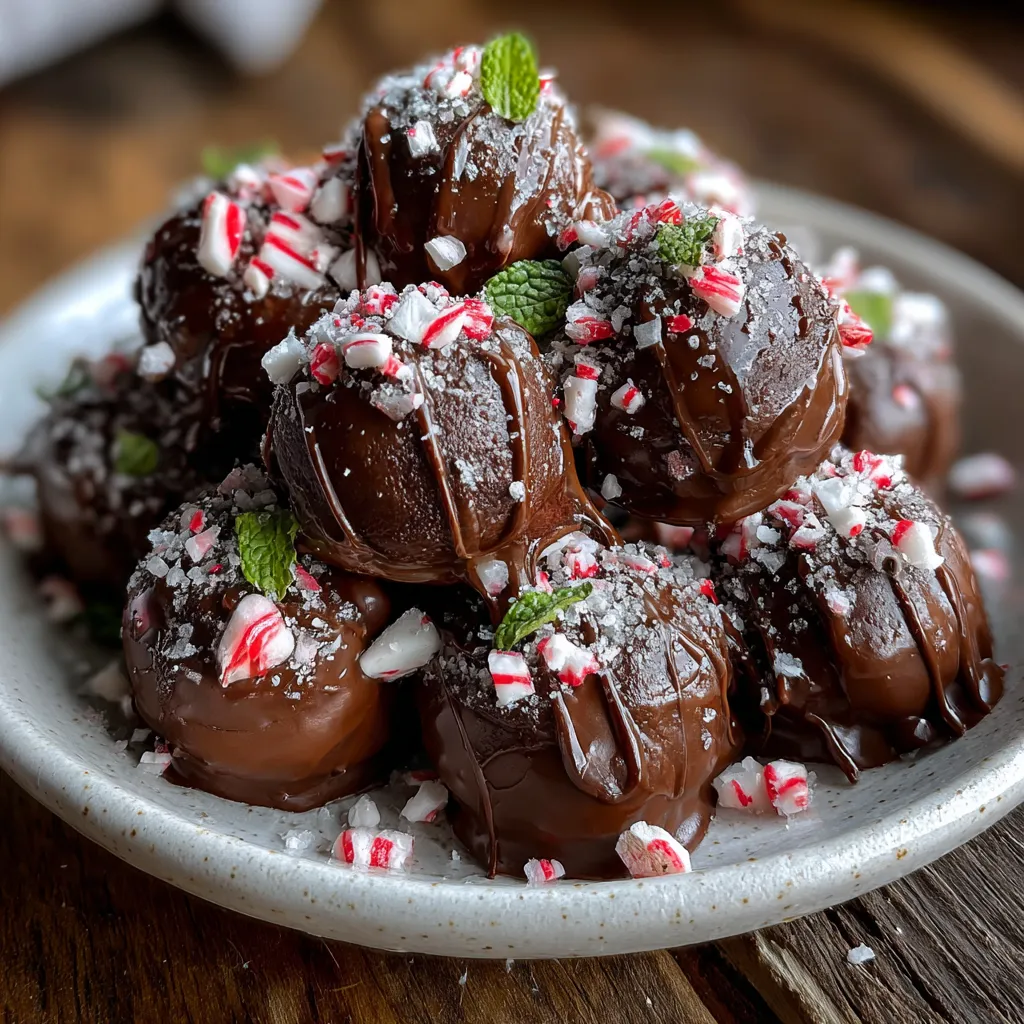

Decadent Dark Chocolate Peppermint Truffles with Creamy Filling
Description
Creamy ganache centers enriched with peppermint extract hide inside a dark chocolate shell. Each truffle is dusted with cocoa or crushed candy cane for a refreshing snap and silky melt-in-your-mouth experience.
Ingredients
Instructions
-
Begin by chopping the dark chocolate into small pieces and placing it in a heatproof bowl. This helps the chocolate melt evenly.
-
In a small saucepan over medium heat, bring the heavy cream just to a simmer. Do not let it boil, as this could scorch the cream.
-
Once the cream is simmering, pour it over the chopped chocolate. Allow the mixture to sit for about 2-3 minutes. This resting period will soften the chocolate, making it easier to mix.
-
After waiting, gently whisk the chocolate and cream together until smooth and completely combined. Incorporate the unsalted butter and peppermint extract into the mixture, stirring until fully blended.
-
Cover the bowl with plastic wrap and refrigerate for about 1-2 hours, or until the chocolate mixture is firm enough to scoop.
-
Once the chocolate has set, use a small cookie scoop or a melon baller to portion out the chocolate mixture. Roll each portion into a ball between your palms. This can get a little messy, so be prepared!
-
Place the truffles on a parchment-lined baking sheet. After forming all the balls, return them to the refrigerator to chill for another 30 minutes.
-
In a separate bowl, place the unsweetened cocoa powder. You can also have a bowl of crushed peppermint candies ready for coating some of the truffles.
-
Once the truffles are firm, remove them from the refrigerator. Roll half of the truffles in cocoa powder and the other half in crushed peppermint candies to coat. Make sure each truffle is fully covered and place the coated truffles back onto the baking sheet.
-
Finally, transfer the truffles to a decorative box or treat them in a serving dish. They can be stored in the refrigerator for up to one week, if they last that long!
Note
- For a richer flavor, consider using high-quality chocolate brands like Valrhona or Callebaut.
- You can substitute the heavy cream with coconut cream for a dairy-free version.
- To make the truffles even more festive, consider drizzling white chocolate over the top before letting them set.
- These truffles make excellent gifts during the holiday season—be sure to package them nicely!
- Experiment with other extracts like vanilla or even orange for a different flavor profile.

