

Salted Caramel Icebox Cake layers crisp graham crackers between clouds of vanilla whipped cream and ribbons of buttery salted caramel. This no-bake dessert brings together the perfect balance of salty-sweet caramel and cool, melt-in-your-mouth whipped layers. Each chilled slice reveals contrasting textures—a hint of sea salt enhancing the rich, creamy sweetness. Whether you’re craving a simple yet elegant dessert or looking to impress guests, this easy treat will have everyone coming back for seconds!
Key Ingredients
Before diving into assembly, gather these pantry staples to build our luscious layers:
- 200 g granulated sugar: Provides the base sweetness and caramelizes into a rich amber sauce.
- 60 ml water: Helps dissolve the sugar and control the caramel’s consistency.
- 60 g unsalted butter: Adds a creamy, buttery richness without extra salt.
- 120 ml heavy cream: Creates the smooth, pourable caramel when stirred in.
- 1 tsp sea salt: Balances sweetness with a subtle salty kick.
- 240 ml heavy cream: Whipped into clouds for the soft, stable layers.
- 60 g powdered sugar: Sweetens and stabilizes the whipped cream.
- 1 tsp vanilla extract: Infuses the cream with warm, aromatic flavor.
- 24 sheets graham crackers: Build the crisp, cake-like structure of each layer.
How To Make Salted Caramel Icebox Cake
Crafting this dessert is all about mastering two components—homemade salted caramel and fluffy whipped cream—then layering them with graham crackers for a no-bake marvel. You’ll start by caramelizing sugar, finish a silky salted caramel sauce, whip up vanilla-scented peaks, and assemble the cake so it chills into perfect, cake-like slices.
1. In a medium saucepan, combine 200 g granulated sugar and 60 ml water. Cook over medium heat, swirling the pan occasionally until the sugar melts and transforms from pale gold to a deep amber color.
2. Remove from heat and carefully whisk in 60 g unsalted butter until fully melted. Slowly pour in 120 ml heavy cream, stirring constantly until the sauce is smooth and glossy. Stir in 1 tsp sea salt, then set the caramel aside to cool slightly.
3. Chill a mixing bowl and beaters in the freezer for 10 minutes. In the chilled bowl, whip 240 ml heavy cream, 60 g powdered sugar, and 1 tsp vanilla extract on medium-high speed until stiff peaks form.
4. Line a loaf pan with plastic wrap. Spread a thin layer of whipped cream on the bottom and top with a single layer of graham crackers to anchor the base.
5. Evenly spread more whipped cream over the crackers, then drizzle 1–2 tablespoons of the cooled salted caramel. Repeat layers—crackers, cream, caramel—until the pan is full, finishing with a final whipped cream layer.
6. Drizzle any reserved caramel over the top. Cover with plastic wrap and refrigerate for at least 8 hours or overnight to allow flavors and textures to meld.
7. Unwrap the chilled cake, slice into portions with a sharp knife, and serve immediately with extra caramel drizzles if desired.
Serving Suggestions
When it’s time to present your Salted Caramel Icebox Cake, a few simple touches can turn each slice into a showstopper. These ideas highlight the silky cream and salty-sweet caramel layers while adding flavor contrast and flair.
- Sprinkle flaky sea salt on top of each slice to amplify the caramel’s salty notes.
- Garnish with fresh berries like raspberries or strawberries for a pop of color and tartness.
- Warm extra caramel and drizzle it over each serving just before plating to keep the sauce silky.
- Pair with espresso or strong coffee to balance the cake’s sweetness with a robust, bitter edge.
Tips For Perfect Salted Caramel Icebox Cake
Mastering this no-bake marvel is all about timing and texture. Below are some friendly tips to ensure your Salted Caramel Icebox Cake sets up perfectly, remains creamy, and even gains a bit of crunch when you want it.
- Chill the assembled cake overnight to allow flavors to meld and graham crackers to soften into cake-like layers.
- Store any leftovers covered in the refrigerator for up to 3 days to keep it fresh.
- Use full-fat heavy cream when whipping so the layers stay stable and fluffy.
- For an extra crunch, sprinkle chopped toasted pecans between layers during assembly.
How To Store It
Proper storage keeps your Salted Caramel Icebox Cake tasting its best. Chilled whipped cream layers and buttery caramel can absorb fridge odors or weep if left uncovered, so follow these tips to maintain that perfect balance of textures and flavors.
- Refrigerate covered: Wrap the cake tightly with plastic wrap or transfer to an airtight container, storing on a middle shelf for up to 3 days.
- Portion first: Slice individual servings and seal each in plastic wrap, making it easy to grab a treat without handling the whole cake.
- Use airtight containers: Place extra slices in a sealed container to prevent moisture loss and flavor transfer from other foods.
- Freeze for longer storage: Lay slices flat on a baking sheet, freeze until firm, then transfer to a freezer bag for up to 1 month. Thaw in the refrigerator before serving.
Frequently Asked Questions
Here are some quick answers to common queries, so your Salted Caramel Icebox Cake turns out flawlessly every time.
- Q: How can I tell when the caramel has reached the correct stage before adding butter and cream?
A: Watch for the sugar-water mixture to melt completely and transform from pale gold to a deep amber hue. This usually takes 8–10 minutes over medium heat. Swirl the pan gently—avoid stirring—to ensure even cooking and prevent premature crystallization. Once you see a rich amber color, remove from heat immediately to avoid burning.
- Q: What’s the best way to achieve stable stiff peaks when whipping the cream?
A: Chill both the heavy cream and the mixing bowl for at least 15 minutes before whipping. Use cold beaters on medium-high speed, adding the powdered sugar and vanilla extract gradually as the cream thickens. Stop whipping as soon as firm peaks hold their shape without collapsing for layers that won’t weep.
- Q: Can I use salted butter instead of unsalted in the caramel?
A: It’s best to use unsalted butter so you can control the overall salt level. If you only have salted butter, reduce or omit the added sea salt in the caramel step. Taste the caramel before adding more salt to avoid an overly salty result.
- Q: How do I layer the cake for even distribution of caramel and whipped cream?
A: Start with a thin coat of whipped cream to anchor the first graham cracker layer so it doesn’t shift. After each cracker layer, use an offset spatula to spread a uniform layer of whipped cream about 1 cm thick, then drizzle 1–2 tablespoons of cooled salted caramel. Repeat until you finish with whipped cream, reserving some caramel for the top.
- Q: Is it possible to substitute the graham crackers, and what effect will it have?
A: You can substitute whole wheat or digestive biscuits, but they may absorb moisture differently and yield a denser cake. If using thinner or thicker crackers, adjust the whipped cream quantity slightly. Thinner crackers may require more cream to fill gaps, while thicker ones need less.
- Q: How long and where should I chill the icebox cake before serving?
A: Cover the assembled cake with plastic wrap and refrigerate for at least 8 hours, ideally overnight. This resting time allows the crackers to soften into cake-like layers and the flavors to meld. Store it on a middle shelf away from strong-smelling foods to keep flavors pure.
- Q: What’s the best way to store leftovers, and how long will they keep?
A: Rewrap the cake tightly in plastic wrap or transfer individual slices into an airtight container. Store in the refrigerator for up to 3 days. Before serving again, let slices sit at room temperature for 10 minutes to regain a tender texture, and add a fresh drizzle of caramel if desired.
What Makes This Special
What really sets this Salted Caramel Icebox Cake apart is its playful contrast of textures: crisp graham crackers soften into tender layers, airy vanilla whipped cream holds those sweet-salty caramel ribbons, and a touch of sea salt sharpens every bite. It’s a no-bake wonder that works because you assemble it with care and let time do the magic—no oven required! Print this article, stash it in your recipe binder, and wield your favorite spatula proudly. If you give it a whirl or tweak the nuts, drop a comment or question—I’d love to hear how it turns out!
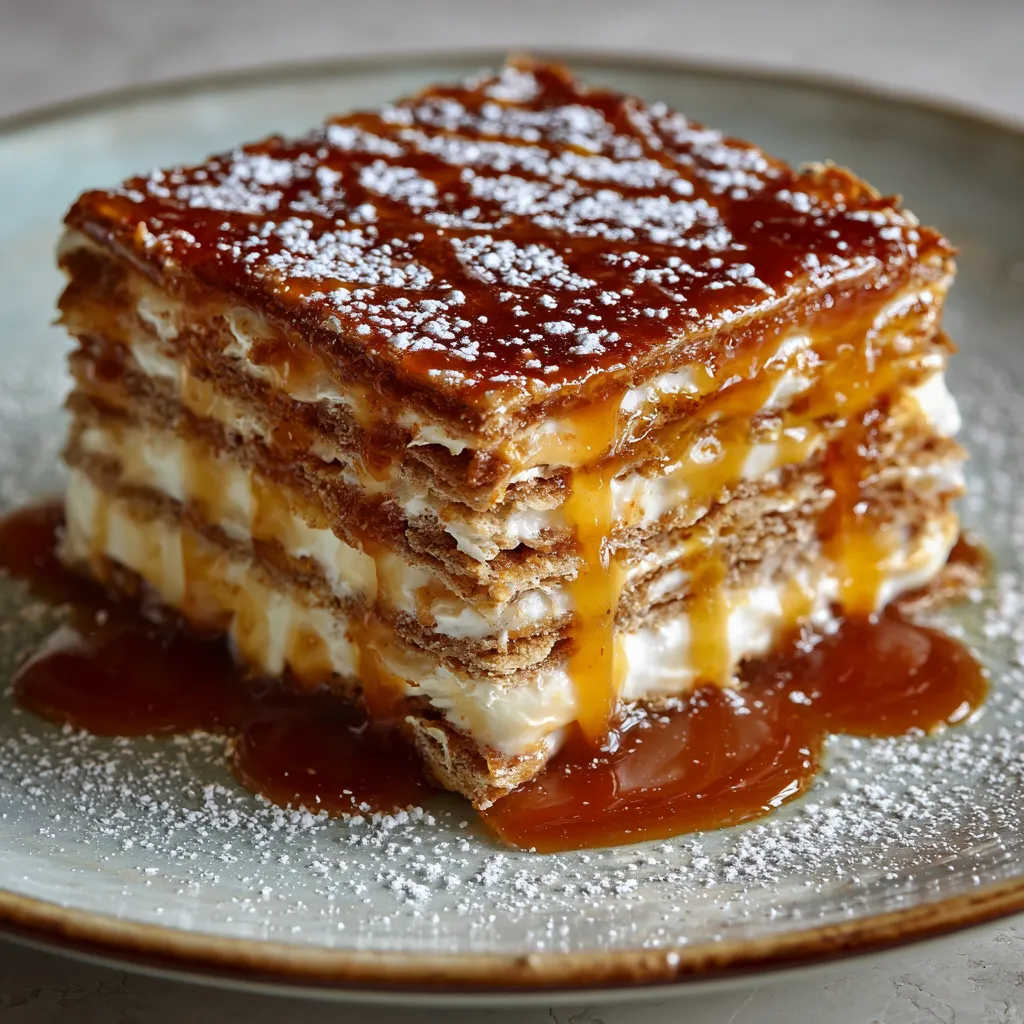

Salted Caramel Icebox Cake
Description
This icebox cake stacks crisp graham crackers with clouds of vanilla whipped cream and ribbons of buttery salted caramel. Each chilled slice reveals contrasting textures and a luscious, melt-away sweetness with a hint of sea salt.
Ingredients
Instructions
-
In a medium saucepan combine granulated sugar and water and cook over medium heat, swirling the pan occasionally until the sugar melts and turns a deep amber color.
-
Remove from heat and carefully whisk in unsalted butter until melted, then slowly pour in 120 ml heavy cream, stirring constantly until smooth. Stir in sea salt and set caramel aside to cool slightly.
-
In a chilled bowl whip 240 ml heavy cream, powdered sugar, and vanilla extract until stiff peaks form.
-
Line a loaf pan with plastic wrap and spread a thin layer of whipped cream on the bottom. Top with a single layer of graham crackers.
-
Spread whipped cream evenly over crackers, drizzle with a few tablespoons of salted caramel, then repeat layers until pan is full, finishing with whipped cream.
-
Drizzle reserved caramel over the top, cover with plastic wrap, and refrigerate for at least 8 hours or overnight.
-
Unwrap cake, slice into portions, and serve chilled with extra caramel drizzles if desired.
Note
- Chill the cake overnight for the best texture and flavor melding.
- Store any leftovers covered in the refrigerator for up to 3 days.
- Use full-fat heavy cream to ensure stable whipped layers.
- For added crunch, sprinkle chopped toasted pecans between layers.

