

Strawberry Crumble Cheesecake is the ultimate indulgence for berry lovers and cheesecake fanatics alike. Layers of velvety cream cheese melting into pockets of bright strawberry ribbons meet a golden, buttery crumble that crackles with every bite. Whether you’re hosting a special gathering or simply treating yourself, this dessert brings that perfect blend of tangy fruit and crisp texture you’ve been dreaming of.
Key Ingredients
Before we dive into the baking fun, let’s gather everything you need for this showstopper dessert:
- 1 1/2 cups (150 g) graham cracker crumbs or digestive biscuit crumbs: crisp base that forms a sturdy, buttery foundation
- 2 tbsp granulated sugar: adds a touch of sweetness to balance the tartness
- 1/4 tsp fine sea salt: enhances all the flavors in the crust
- 6 tbsp (85 g) unsalted butter, melted: binds the crumbs and adds rich creaminess
- 24 oz (680 g) cream cheese, full-fat, at room temperature: the silky backbone of your cheesecake filling
- 3/4 cup (150 g) granulated sugar: sweetens and lightens the cream cheese mixture
- 1/3 cup (80 ml) sour cream, at room temperature: adds tang and improves texture
- 1/3 cup (80 ml) heavy cream, at room temperature: enriches the filling for extra creaminess
- 3 large eggs, at room temperature: helps the filling set without cracks
- 2 tsp pure vanilla extract: deepens flavor with warm vanilla notes
- 1 tbsp fresh lemon juice: brightens the filling and balances sweetness
- 1 tsp finely grated lemon zest (optional): adds a fresh citrus punch
- 1 tbsp cornstarch or all-purpose flour: stabilizes the filling for a smooth texture
- Pinch of fine sea salt: rounds out all the flavors
- 2 1/2 cups (350 g) fresh strawberries, hulled and chopped: the star of the strawberry compote
- 1/4 cup (50 g) granulated sugar: sweetens the strawberry layer
- 1 tbsp lemon juice: helps strawberries release their juices
- 2 tsp cornstarch: thickens the compote into glossy ribbons
- 2 tbsp water: dissolves the cornstarch for a smooth sauce
- 3/4 cup (95 g) all-purpose flour: forms the crumbly topping base
- 1/2 cup (50 g) rolled oats (optional but recommended for texture): adds hearty crunch to the crumble
- 1/3 cup (70 g) light brown sugar, packed: brings warmth and chewiness
- 1/4 cup (50 g) granulated sugar: lifts the crumble’s sweetness
- 1/4 tsp fine sea salt: balances richness
- 1/2 tsp ground cinnamon (optional): a hint of cozy spice
- 6 tbsp (85 g) unsalted butter, cold and cut into small cubes: creates those irresistible pea-sized crumbs
- 1/2 tsp vanilla extract: ties the crumble flavors together
- 1 cup (150 g) fresh strawberries, halved or sliced: pretty garnish for slicing
- Whipped cream for serving: light, airy finishing touch
- Fresh mint leaves: adds a pop of color and freshness
How To Make Strawberry Crumble Cheesecake
Ready to assemble this masterpiece? The process involves layering a crisp graham cracker crust, a dreamy cream cheese filling, a vibrant strawberry compote, and a buttery oat crumble topping. You’ll work through making each component—from toasting or chilling the crust, cooking down fresh berries into glossy sauce, whipping up a velvety filling in just the right order, to creating that addictive crumble. With a water bath for even baking and a patient cooling and chilling schedule, you’ll achieve a silky, crack-free cheesecake crowned by bright strawberry swirls and a satisfyingly crunchy topping.
1. Prepare the pan
Preheat nothing just yet—grab a 9-inch (23 cm) springform pan. Lightly grease the sides and bottom with butter or non-stick spray. Line the base with parchment paper so your cheesecake lifts out flawlessly. Wrap the outside with 2–3 layers of heavy-duty aluminum foil to guard against water leaks if you opt for a water bath.
2. Make the crust
In a mixing bowl, stir together graham cracker crumbs, sugar, and salt. Pour in the melted butter and mix with a fork until all crumbs are evenly moistened, resembling wet sand. Transfer to your prepared pan, then firmly press the mixture into an even layer using the bottom of a glass or measuring cup. Chill in the fridge for at least 15 minutes—or bake at 350°F (175°C) for 8 minutes for a toasty edge—then let it cool if baked.
3. Prepare the strawberry layer
Combine chopped strawberries, sugar, and lemon juice in a small saucepan. Cook over medium heat, stirring occasionally, until berries release their juices and soften, about 5–7 minutes. Whisk cornstarch and water in a bowl, then stir into the fruit. Continue cooking 1–3 minutes until sauce is thick and glossy, then remove from heat and cool to room temperature.
4. Make the crumble topping
In a medium bowl, mix flour, rolled oats, brown sugar, granulated sugar, salt, and cinnamon if using. Add cold butter cubes, then use fingertips or a pastry cutter to work butter into dry ingredients until you see coarse crumbs with some pea-sized pieces. Drizzle in vanilla extract, toss gently, and refrigerate while you move on to the filling.
5. Prepare the cheesecake filling
Preheat your oven to 325°F (160°C). In a large bowl, beat room-temperature cream cheese on medium speed until completely smooth, about 2–3 minutes, scraping down the sides. Add sugar and beat another 1–2 minutes until light. Stir in sour cream, heavy cream, vanilla, lemon juice, lemon zest, cornstarch, and salt on low speed until silky. Add eggs one at a time on low, mixing until just combined. Tap the bowl a few times on the counter to release big air bubbles.
6. Assemble the cheesecake
Pour the filling over the chilled crust, smoothing the top with an offset spatula. Spoon dollops of cooled strawberry compote across the surface, then swirl gently with a knife or skewer for distinct pockets of fruit and filling—avoid over-swirl.
7. Add the crumble
Remove the crumble from the fridge and evenly sprinkle it over the strawberry-swirled top, leaving tiny gaps where the layers peek through. Lightly press so it sticks but don’t pack it down.
8. Prepare a water bath (recommended)
Place the foil-wrapped springform pan in a large roasting pan. Carefully pour hot water around it until it reaches halfway up the sides—avoid splashing into the cheesecake. Alternatively, set a separate pan of hot water on a lower rack for steam.
9. Bake
Bake at 325°F (160°C) for 60–75 minutes. Edges should look set and slightly puffed; the center will wobble gently. If the crumble browns too quickly, tent it loosely with foil for the last 10–15 minutes.
10. Cool gradually
Turn off the oven and crack the door open. Let the cheesecake rest inside for 45–60 minutes—this gentle cooldown prevents cracks. Remove from the water bath, peel off foil, and set on a wire rack to cool to room temperature, about 1–2 hours.
11. Chill fully
Cover the pan and refrigerate for at least 6 hours, preferably overnight, so the texture firms up and flavors deepen.
12. Garnish and serve
Run a thin knife around the edge, release the springform ring, and transfer to a plate or stand. Top with fresh strawberry halves, whipped cream dollops, and mint leaves. Slice with a sharp knife, wiping the blade clean between cuts for picture-perfect servings.
Serving Suggestions
This Strawberry Crumble Cheesecake shines on its own, but try these ideas to elevate each slice:
- Serve slightly chilled with a dollop of whipped cream to accentuate the creamy mouthfeel.
- Add a side of extra strawberry compote, spooned generously for more bright fruit flavor.
- Pair with a scoop of vanilla bean ice cream for a cool contrast between soft and crunchy textures.
- Garnish each slice with a sprig of fresh mint and a dusting of powdered sugar for a café-style presentation.
Tips For Perfect Strawberry Crumble Cheesecake
With a few insider tricks, your Strawberry Crumble Cheesecake will turn out flawless every time. Patience and precise temperatures are key—you want that ultra-smooth filling and a crisp, golden topping without any cracks. Keep ingredients at room temperature, handle the batter gently, and allow plenty of chilling time for the flavors to meld. Now, here are some quick tips to make your life even easier:
- For the cleanest slices, chill the cheesecake overnight and slice it straight from the refrigerator with a hot, wiped-dry knife.
- You can substitute graham crackers with vanilla wafers, speculoos, or digestive biscuits for a flavor twist.
- If fresh strawberries are out of season, use frozen ones for the cooked layer (no need to thaw; just cook a few minutes longer).
- To make this ahead for an event, prepare 1–2 days in advance; flavors improve with time in the fridge.
- If you prefer a stronger strawberry presence, double the strawberry layer and swirl half into the batter and reserve half for spooning over slices when serving.
How To Store It
Planning ahead or saving leftovers? Proper storage keeps that strawberry-crumble magic intact for days. Always protect the cheesecake from drying out or absorbing other odors:
- Refrigerate in the springform pan with the ring on, loosely covered with plastic wrap or foil, for up to 5 days.
- Airtight container: Transfer slices to a sealed container, layering parchment paper between pieces to prevent sticking.
- Freeze slices: Wrap individual portions in plastic wrap and foil; freeze up to 1 month. Thaw overnight in the fridge before serving.
- Keep garnishes separate: Store extra strawberry sauce or whipped cream in a small jar to add fresh right before enjoying.
Frequently Asked Questions
Wondering about timing, technique, or substitutions? You’re not alone—here are answers to the most common questions:
- How long does it take to prepare and bake the Strawberry Crumble Cheesecake?
From start to finish, plan for about 8–10 hours, most of which is chilling time. Active prep (making the crust, strawberry layer, crumble, and filling) takes roughly 1½–2 hours. Baking in a water bath is 60–75 minutes, plus an hour of gradual cooling in the oven. Finally, you must refrigerate the cheesecake for at least 6 hours, preferably overnight, before serving.
- What’s the best way to prevent cracks on the cheesecake surface?
To minimize cracking, use room-temperature ingredients so the batter is smooth and lump-free. Add eggs one at a time on low speed to avoid over-incorporating air. Bake in a water bath or steam environment to provide gentle, even heat. Once baking is complete, turn off the oven and let the cake cool with the door ajar for 45–60 minutes before removing it. This gradual cooling reduces temperature shock that leads to cracks.
- Can I use frozen strawberries for the strawberry layer?
Yes. You can substitute frozen strawberries without thawing; cook them a few minutes longer (about 8–10 minutes) so they release juices. Proceed with the sugar and lemon juice, then add your cornstarch slurry and water. The sauce will thicken and become glossy. Allow it to cool to room temperature before swirling into the cheesecake.
- How can I make the crust or crumble gluten-free?
For a gluten-free crust, swap graham or digestive crumbs for gluten-free graham crackers or almond flour mixed with a touch of gluten-free oat flour. Ensure your oats in the crumble topping are certified gluten-free. Measure and press just as you would with the original recipe. Baking times remain the same, though the crust may brown slightly faster, so watch it closely if you toast it.
- What should I do if the crumble topping browns too quickly during baking?
If the crumble darkens before the filling is set, tent the top loosely with aluminum foil. Make sure it doesn’t touch the crumble directly. Continue baking until the edges of the cheesecake are set and the center still wobbles slightly. Remove the foil for the final few minutes if you want to crisp it back up.
- How do I store leftovers, and how long will they keep?
Store the cheesecake in its springform pan or transferred to an airtight container in the refrigerator for up to 5 days. Cover it lightly with plastic wrap or foil to prevent it from absorbing fridge odors. For the best texture, slice it chilled with a hot, wiped-dry knife. You can also spoon extra strawberry sauce or whipped cream over individual slices just before serving.
- Can I prepare this cheesecake in advance for an event?
Absolutely. This cheesecake benefits from an overnight chill for the flavors to meld and the filling to firm up. You can complete all steps—including garnish—and refrigerate it up to 2 days before your event. If you add fresh strawberries or whipped cream garnish, do so no more than an hour before serving to keep them vibrant.
- How do I achieve distinct strawberry pockets without over-swirling?
After pouring the batter, spoon the cooled strawberry mixture in small dollops across the surface. Use a thin knife or skewer to gently drag through the batter in an “S” or figure-eight pattern, limiting each swirl stroke to 1–2 inches. Stop as soon as you see color trails forming; over-swirling blends the two layers rather than creating separate pockets.
What Makes This Special
This Strawberry Crumble Cheesecake stands out because it marries the lush creaminess of a classic cheesecake filling with ruby-red pockets of fruity compote, all topped with a buttery oat crumble that crackles delightfully under your fork. Its advanced technique—embracing a water bath, precise temperature control, and patient chilling—rewards you with a crack-free, ultra-silky slice every time. You can print and save this recipe for your next gathering or cozy night in. Got questions, proud results, or fun tweaks? Leave a comment and let’s chat about your crumbly, berry-filled creation!
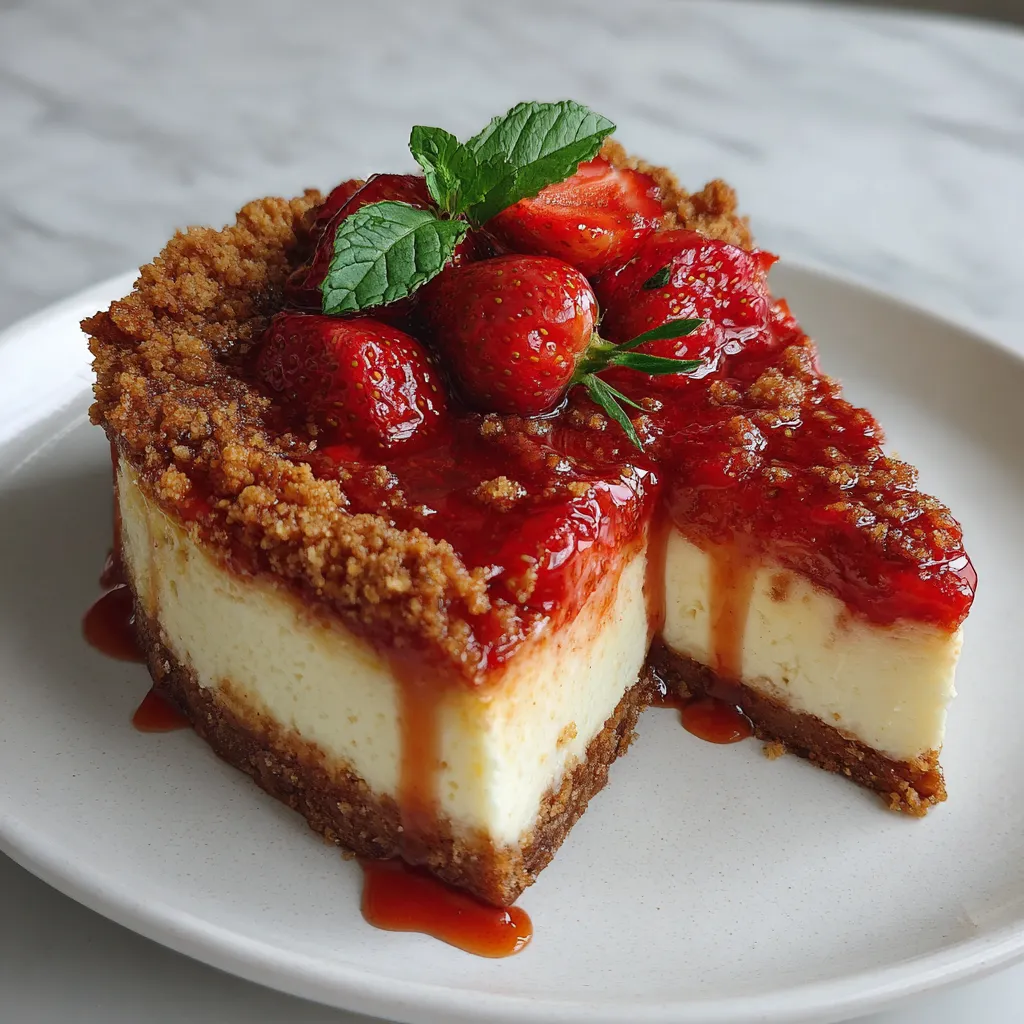

Strawberry Crumble Cheesecake
Description
Layers of velvety cream cheese melting into pockets of bright strawberry ribbons meet a golden, buttery crumble that crackles with every bite.
Ingredients
Instructions
-
Prepare the pan:
-
- Use a 9-inch (23 cm) springform pan.
-
- Lightly grease the sides and bottom with butter or non-stick spray.
-
- Line the bottom with parchment paper for easy removal.
-
- Wrap the outside of the pan tightly with 2–3 layers of heavy-duty aluminum foil to prevent water leakage if using a water bath.
-
Make the crust:
-
- In a mixing bowl, combine graham cracker crumbs, sugar, and salt.
-
- Pour in the melted butter and mix with a fork until all crumbs are evenly moistened and resemble wet sand.
-
- Transfer the mixture to the prepared springform pan.
-
- Press the crumbs firmly into the bottom of the pan using the bottom of a glass or measuring cup to create an even, compact layer.
-
- Chill the crust in the refrigerator for at least 15 minutes while you prepare the filling, or bake at 350°F (175°C) for 8 minutes for a slightly firmer, toasted crust. If baked, allow it to cool while you proceed.
-
Prepare the strawberry layer:
-
- In a small saucepan, combine chopped strawberries, sugar, and lemon juice.
-
- Cook over medium heat, stirring occasionally, until the strawberries release their juices and begin to soften, about 5–7 minutes.
-
- In a small bowl, whisk cornstarch and water until smooth.
-
- Stir the cornstarch slurry into the strawberry mixture.
-
- Continue cooking for 1–3 minutes until the sauce thickens and becomes glossy.
-
- Remove from heat and let it cool to room temperature. It will thicken further as it cools.
-
Make the crumble topping:
-
- In a medium bowl, combine flour, rolled oats, brown sugar, granulated sugar, salt, and cinnamon if using.
-
- Add the cold cubed butter.
-
- Using your fingertips, a pastry cutter, or two forks, cut the butter into the dry ingredients until the mixture looks like coarse crumbs with some pea-sized pieces of butter remaining.
-
- Drizzle in the vanilla extract and toss lightly to combine.
-
- Place the crumble in the refrigerator while you prepare the cheesecake filling so the butter stays cold.
-
Prepare the cheesecake filling:
-
- Preheat the oven to 325°F (160°C).
-
- In a large mixing bowl, beat the room-temperature cream cheese with an electric mixer on medium speed until completely smooth and creamy, about 2–3 minutes. Scrape down the sides and bottom of the bowl.
-
- Add the sugar and beat again until light and smooth, 1–2 minutes more.
-
- Add the sour cream, heavy cream, vanilla, lemon juice, lemon zest (if using), cornstarch, and salt. Beat on low to medium-low speed until combined and silky, scraping the bowl as needed.
-
- Add the eggs one at a time, beating on low speed after each addition just until incorporated. Do not overbeat once the eggs are added, as this can add too much air and cause cracking.
-
- Tap the bowl lightly on the counter a few times to release any large air bubbles.
-
Assemble the cheesecake:
-
- Pour the cheesecake filling over the prepared crust in the springform pan.
-
- Gently smooth the top with an offset spatula or the back of a spoon.
-
- Spoon the cooled strawberry mixture over the top in small dollops, then gently swirl some of it into the cheesecake with a knife or skewer, leaving some thicker patches for bold strawberry pockets.
-
- Do not over-swirl; you want distinct areas of cheesecake and strawberry.
-
Add the crumble:
-
- Take the chilled crumble mixture out of the refrigerator.
-
- Sprinkle it evenly over the top of the strawberry-swirled cheesecake batter, covering most of the surface but leaving small gaps where the strawberry and cheesecake peek through.
-
- Lightly press the crumble down so it adheres to the batter but do not pack it firmly.
-
Prepare a water bath (recommended for smooth texture):
-
- Place the foil-wrapped springform pan in a large roasting pan.
-
- Pour hot water into the roasting pan until it comes halfway up the sides of the springform pan, being careful not to splash water into the cheesecake.
-
- Alternatively, place a separate pan of hot water on a lower oven rack to create steam without directly bathing the cheesecake.
-
Bake:
-
- Bake at 325°F (160°C) for 60–75 minutes.
-
- The edges should look set and slightly puffed, and the center should still have a gentle wobble when you jiggle the pan.
-
- If the crumble is browning too quickly near the end, tent the top loosely with foil.
-
Cool gradually:
-
- Turn off the oven and crack the door open slightly.
-
- Let the cheesecake sit in the oven for 45–60 minutes to cool slowly and reduce the risk of cracks.
-
- Remove the pan from the water bath and carefully remove the foil.
-
- Place the cheesecake on a wire rack and allow it to cool to room temperature, 1–2 hours.
-
Chill fully:
-
- Once at room temperature, cover the cheesecake (still in the pan) and refrigerate for at least 6 hours, preferably overnight.
-
- This time allows the texture to set and the flavors to deepen.
-
Garnish and serve:
-
- Run a thin knife around the edge of the cheesecake to loosen it from the sides of the pan.
-
- Release the springform ring and transfer the cheesecake to a serving plate or cake stand.
-
- Just before serving, top with fresh strawberry halves or slices.
-
- Add small swirls or dollops of whipped cream around the edges or in the center if desired.
-
- Garnish with a few mint leaves for a fresh, vibrant look.
-
- Slice with a sharp knife, wiping the blade clean between cuts for neat slices.
Note
- For the cleanest slices, chill the cheesecake overnight and slice it straight from the refrigerator with a hot, wiped-dry knife.
- You can substitute graham crackers with vanilla wafers, speculoos, or digestive biscuits for a flavor twist.
- If fresh strawberries are out of season, use frozen ones for the cooked layer (no need to thaw; just cook a few minutes longer).
- To make this ahead for an event, prepare 1–2 days in advance; flavors improve with time in the fridge.
- If you prefer a stronger strawberry presence, double the strawberry layer and swirl half into the batter and reserve half for spooning over slices when serving.

