

Strawberry Layer Cake is a celebration of spring and summer flavors. Strawberry puree-infused vanilla cake layers crowned with fluffy whipped cream and fresh berry slices create an irresistibly light dessert. Each bite of the tender sponge meets sweet-tart strawberry puree, then melts in your mouth alongside clouds of lightly sweetened cream. This recipe combines simple pantry staples with fresh fruit to deliver a showstopping treat that’s perfect for birthdays, brunches, or anytime you need a cheerful pick-me-up.
Key Ingredients
Every memorable Strawberry Layer Cake starts with quality ingredients that work together to create light, flavorful layers and a dreamy whipped cream topping.
- 2 cups all purpose flour: Base of the cake layers, providing structure and a tender crumb.
- 1 1/2 cups granulated sugar: Adds sweetness to the sponge and balances the tartness of strawberries.
- 2 teaspoons baking powder: Leavening agent that helps the cake rise and become fluffy.
- 1/2 teaspoon baking soda: Works with acidic ingredients for additional lift and lightness.
- 1/2 teaspoon salt: Enhances the cake’s flavor and balances the sweetness.
- 1/2 cup unsalted butter, softened: Adds richness and moisture while contributing to a tender texture.
- 2 large eggs: Bind the ingredients and provide structure while enriching the batter.
- 1 teaspoon vanilla extract: Infuses the cake with warm, aromatic flavor.
- 1 cup milk: Keeps the batter moist and helps achieve a smooth, pourable consistency.
- 1 1/2 cups fresh strawberries, pureed: Imparts natural strawberry flavor and moisture into the cake.
- 2 tablespoons granulated sugar: Sweetens the strawberry puree and enhances its natural sweetness.
- 1 teaspoon lemon juice: Brightens the puree and balances the sweetness with a hint of acidity.
- 2 cups heavy cream: Whipped to stiff peaks to create light, billowy frosting.
- 3/4 cup powdered sugar: Stabilizes the whipped cream and adds a touch of sweetness.
- 1 teaspoon vanilla extract: Intensifies the whipped cream’s flavor with subtle warmth.
- 1 cup sliced strawberries: Provides fresh, decorative topping and extra bursts of strawberry flavor.
How To Make Strawberry Layer Cake
Baking this Strawberry Layer Cake is a fun process that guides you from mixing a soft, vanilla-infused batter to folding in fresh berry puree. You’ll whip the cream to the perfect consistency, assemble your layers with care, and end up with a gorgeous, multi-layered dessert. Follow these detailed steps for best results:
1. Preheat the oven to 350°F and grease and flour two 8-inch round cake pans, tapping out any excess flour to ensure even baking.
2. In a large bowl, whisk together the all-purpose flour, granulated sugar, baking powder, baking soda, and salt until fully combined and aerated.
3. In another bowl, use an electric mixer to cream the softened butter until smooth, then beat in the eggs one at a time, making sure each is incorporated before adding the next, followed by the vanilla extract.
4. Alternately add the dry ingredients and milk to the butter mixture in two additions—starting and ending with the dry ingredients—stirring gently until just combined and avoiding overmixing.
5. Gently fold the pureed strawberries into the batter using a spatula, scraping the bowl to ensure the berry flavor is evenly distributed.
6. Divide the batter evenly between the prepared pans and bake for 25 to 30 minutes, or until a toothpick inserted into the center comes out clean.
7. Let the cakes cool in the pans for 10 minutes, then carefully turn out the layers onto wire racks to cool completely.
8. While the cakes cool, whip the heavy cream, powdered sugar, and vanilla extract in a chilled bowl on high speed until stiff peaks form.
9. Place one cooled cake layer on a serving plate, spread a layer of whipped cream evenly over the top, and arrange the sliced strawberries.
10. Top with the second layer, frost the entire cake with the remaining whipped cream, and decorate with extra sliced strawberries for a beautiful finish.
Serving Suggestions
A slice of Strawberry Layer Cake is a delight on its own, but you can elevate it with just a few simple additions. Whether you’re hosting a summer brunch or a cozy afternoon tea, these serving ideas will highlight the cake’s fruity, creamy charm and make every bite even more special.
- Serve each slice chilled to allow the whipped cream to set properly; let the cake rest in the fridge for at least 15 minutes before cutting.
- Dust the top with a light sprinkle of powdered sugar for a delicate, snowy finish that contrasts beautifully with the pink strawberries.
- Add a garnish of fresh mint leaves alongside your slices to introduce a pop of color and a refreshing herbal note.
- Pair with a tall glass of iced tea or a cup of light roast coffee to balance the cake’s sweetness and round out the dessert experience.
Tips For Perfect Strawberry Layer Cake
Getting that perfect Strawberry Layer Cake is all about paying attention to the little details. From selecting the juiciest berries to allowing the cake to rest properly, each step ensures you end up with moist layers and sturdy whipped cream that won’t sag. Read on for some friendly tips that will help you master this recipe and impress everyone who tries it.
- Use the sweetest, ripest strawberries for the best flavor.
- Ensure cakes are completely cool before frosting to prevent melting.
- Chill the assembled cake for at least 1 hour for cleaner slices.
- Store leftovers covered in the refrigerator for up to 3 days.
How To Store It
Proper storage is key to maintaining the freshness and flavor of your Strawberry Layer Cake. With whipped cream frosting and juicy strawberries, you’ll want to keep it chilled and protected from air. Here are a few methods to help you store your cake and enjoy every last slice.
- Wrap the cake in plastic wrap or place it in a cake dome to prevent the whipped cream from absorbing fridge odors and drying out.
- Store in the refrigerator at 35–40°F, ideally on a middle shelf where the temperature stays consistent, for up to 3 days.
- For longer storage, freeze individual slices on a baking sheet until firm, then transfer to an airtight container with parchment paper between layers; thaw in the fridge before serving.
- Bring refrigerated cake to room temperature for 10–15 minutes before serving to enhance flavor and texture.
Frequently Asked Questions
Got a few questions? Here are answers to some of the most common queries about this Strawberry Layer Cake:
- Can I use frozen strawberries instead of fresh for the puree?
Yes, you can substitute frozen strawberries as long as you fully thaw and drain them first. Puree the thawed berries, taste the mixture, and adjust the 2 tablespoons of sugar or lemon juice if the strawberries aren’t as sweet or acidic as fresh ones. Pat the puree dry if it’s too watery to prevent extra moisture in the batter.
- How do I know when the cake layers are fully baked without overbaking?
Insert a toothpick into the center of each cake; if it comes out clean or with a few moist crumbs, they’re done. The top should spring back gently when pressed, and the edges will begin to pull away slightly from the pan. Aim for a total bake time of 25 to 30 minutes, but start checking at 24 minutes to avoid dryness.
- My whipped cream isn’t reaching stiff peaks. What could be going wrong?
Ensure your heavy cream and mixing bowl are well chilled before whipping. Use a cold metal or glass bowl and beaters kept in the refrigerator for at least 15 minutes. Begin at medium speed until foamy, then increase to high. If it still won’t thicken, add a bit more powdered sugar—or chill the bowl and cream again briefly before retrying.
- Why is it important to let the cakes cool completely before frosting and to chill the assembled cake?
Frosting warm cake layers causes whipped cream to melt and slide off, leading to a messy finish. Cooling completely ensures the whipped cream holds its structure. Chilling the assembled cake for at least an hour allows the cream to set, making it much easier to slice cleanly and helping the layers stay aligned when served.
- My cake layers domed in the center. How can I achieve flatter layers?
To minimize doming, start by leveling the batter in each pan with a spatula and tap pans gently on the counter to release air bubbles. Bake at a steady 350°F without opening the oven door during the first 20 minutes. If you still see a dome, you can trim the tops with a serrated knife once the layers are completely cool.
- What’s the best way to store leftovers and keep the cake fresh?
Cover the cake loosely with plastic wrap or place it in a cake dome and refrigerate for up to three days. The whipped cream frosting is perishable, so always keep it chilled. Before serving again, let the cake sit at room temperature for 10 to 15 minutes to soften slightly and bring out the flavors.
What Makes This Special
This Strawberry Layer Cake nails the sweet-and-tart balance with its puree-infused sponge and cloud-like whipped cream layers. The fresh berry slices add a pop of color and a juicy surprise in every bite—no wonder it always disappears first at parties! Keep this article bookmarked or printed so you can whip it up whenever you crave a bright, summery dessert. If you give it a try or have any tweaks, drop a comment below—your feedback and creative spins always brighten my day!
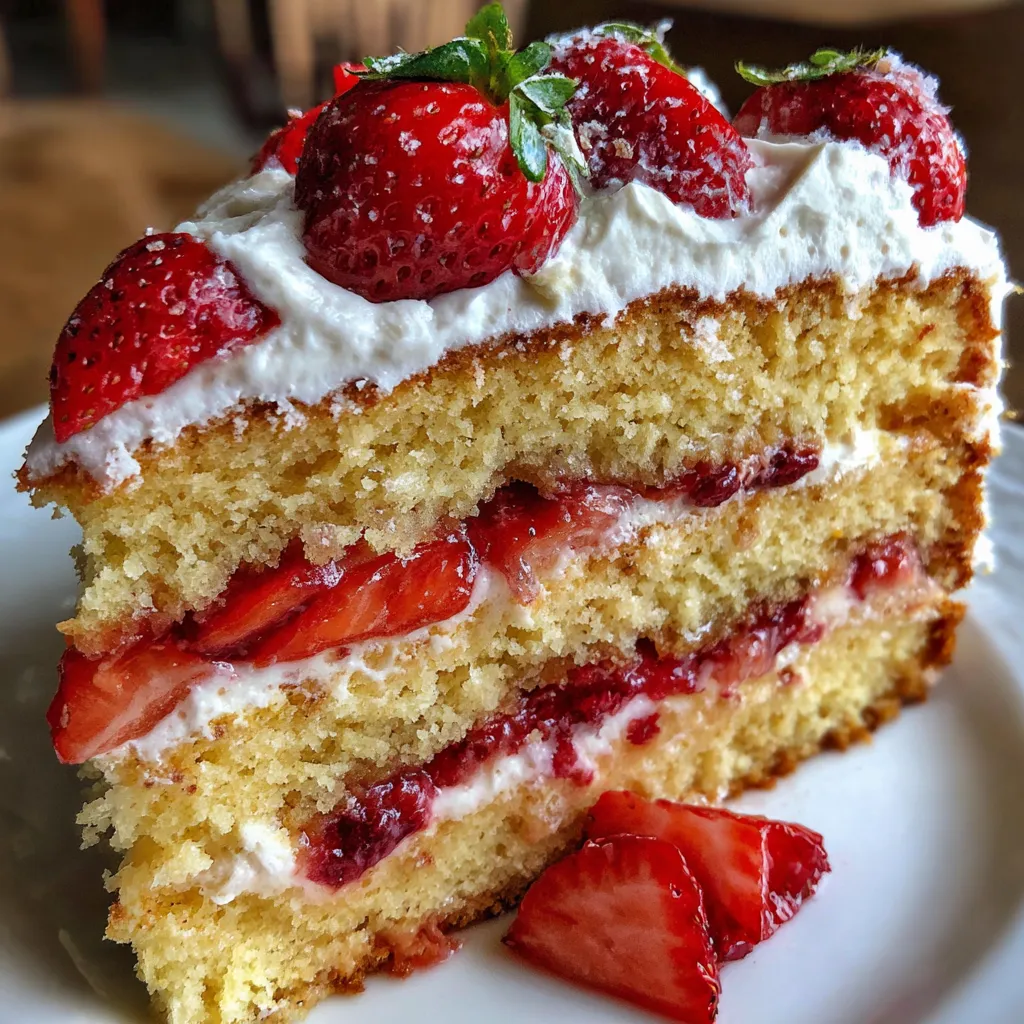

Strawberry Layer Cake
Description
Fluffy vanilla sponge meets sweet-tart strawberry puree. Each layer is wrapped in clouds of lightly sweetened whipped cream and dotted with fresh sliced strawberries for a vibrant, irresistibly light dessert.
Ingredients
Instructions
-
Preheat the oven to 350°F and grease and flour two 8-inch round cake pans.
-
In a large bowl whisk together the flour, granulated sugar, baking powder, baking soda, and salt.
-
In another bowl cream the softened butter until smooth, then beat in the eggs one at a time, followed by the vanilla extract.
-
Alternately add the dry ingredients and milk to the butter mixture in two additions, beginning and ending with the dry ingredients, mixing until just combined.
-
Gently fold in the pureed strawberries until evenly incorporated.
-
Divide the batter evenly between the prepared pans and bake for 25 to 30 minutes or until a toothpick inserted in the center comes out clean.
-
Let the cakes cool in the pans for 10 minutes, then turn them out onto wire racks to cool completely.
-
While the cakes cool, whip the heavy cream, powdered sugar, and vanilla extract in a chilled bowl until stiff peaks form.
-
Place one cake layer on a serving plate, spread a layer of whipped cream, and top with sliced strawberries.
-
Place the second cake layer on top, frost the entire cake with the remaining whipped cream, and decorate the top with extra sliced strawberries.
Note
- Use the sweetest, ripest strawberries for the best flavor.
- Ensure cakes are completely cool before frosting to prevent melting.
- Chill the assembled cake for at least 1 hour for cleaner slices.
- Store leftovers covered in the refrigerator for up to 3 days.

